Fishing in Hawaii is unlike anywhere else in the world. You have steep drop-offs just a short paddle from shore, fast-moving currents between islands, and target species that range from bottom-dwelling snapper to surface-crashing tuna. The problem? Most generic fish finder advice comes from mainland lake fishermen, and that advice often misses the mark for Hawaiian conditions. You need a unit that can handle deep water, saltwater corrosion, and the unique way fish hold around structure here. This Hawaii fish finder guide breaks down exactly what to look for, what to skip, and how to avoid wasting money on a unit that won’t survive island fishing. Whether you’re fishing from a kayak off Oahu or a center console in Kona, the right unit makes all the difference between finding productive water and just taking a boat ride.
Key Takeaways
- Look for a fish finder with at least 500 watts of RMS power to reach Hawaiian bottom fish that hold in 200 to 600 feet of water.
- Use a transducer with CHIRP technology and a ceramic element rated for deep water—standard 2D sonar alone often misses fish holding close to steep structure.
- Matching your screen size to your boat type matters more than you think; smaller kayaks need compact units, while larger boats benefit from bigger, brighter displays.
- Consider GPS and chartplotting features seriously—Hawaiian fishing often means navigating to specific ledges and marking your own waypoints rather than relying on crowded public spots.
Why Hawaiian Waters Demand a Different Fish Finder Approach
Hawaii’s ocean environment is not a typical bass lake or coastal inshore flat. The islands sit on volcanic peaks that rise from extreme depths, meaning you can go from 50 feet to over 1,000 feet within a short distance. This geology creates unique fishing situations. Bottom fish like onaga, ehu, and opakapaka often hold at depths between 300 and 600 feet, frequently hugging ledges and rocky outcroppings. Meanwhile, pelagic species like ono and ahi might show up as marks anywhere from the surface down to 200 feet.
Standard fish finder settings that work well in shallow freshwater often fail here. A basic 2D sonar unit with lower power might still mark bottom at 300 feet, but it will struggle to differentiate between a school of small baitfish and the bigger predators below them. You need a unit with enough power and transducer sensitivity to show you the structure and the fish clearly. Also, saltwater quickly destroys electronics that are not properly rated for marine environments. Corrosion, moisture in the air, and constant UV exposure all take a toll. The unit you choose must have a marine-grade housing and sealed connections, not just the cheapest model you can find at a big-box store. A practical guide like this Hawaii fish finder guide can help you narrow down the specific models that hold up best in these conditions.
What Features Actually Matter for Hawaii Fishing
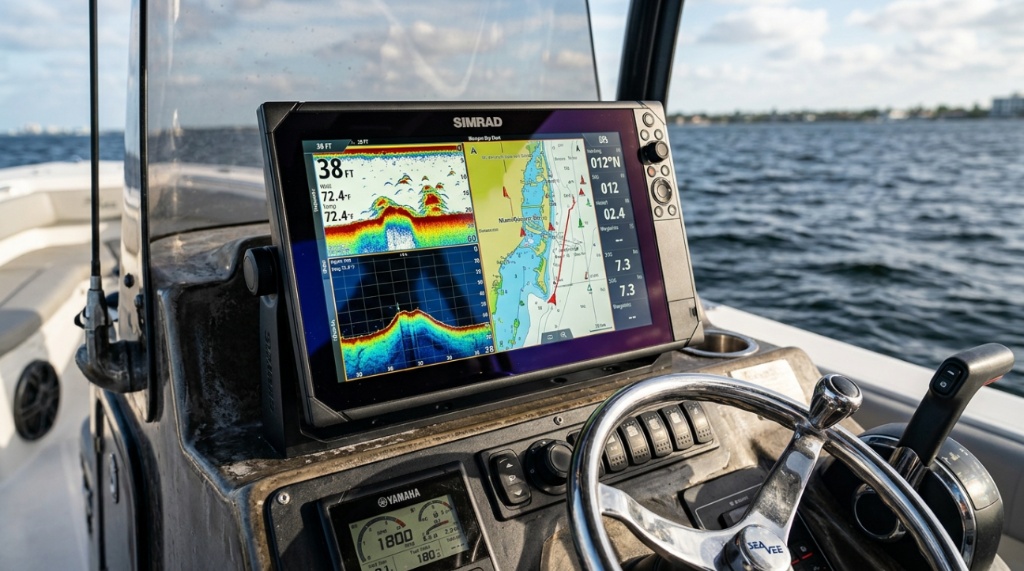
Not every feature on a fish finder is useful. Many anglers end up paying for technology they never touch. Focus your attention on the features that make a real difference in Hawaiian waters: power output, transducer quality, screen visibility, and GPS capability.
Power Output for Deep Water
Power is measured in watts, and this directly determines how well your unit can penetrate deep water. For Hawaii’s typical bottom fishing depths, look for a unit with at least 500 watts RMS (root mean square) output. Units with 600 to 1,000 watts RMS give you a clearer picture at 400 to 600 feet, which is where many bottom fish live. If you plan to fish deeper than 600 feet, consider a unit with 1,000 watts RMS or more. This is not about bragging rights; higher power output means better target separation and more accurate bottom readings in deep water. Without sufficient power, your screen will show a fuzzy bottom line where structure and fish are indistinguishable.
Transducer Quality and CHIRP Technology
The transducer is the “eyes” of your fish finder. Even the most expensive display unit is useless if the transducer cannot send a clean signal. CHIRP technology sends a continuous sweep of frequencies, rather than a single frequency pulse. This gives you better target resolution and helps separate fish that are close to bottom structure or holding in bait balls.
For deep water, you also want a transducer ceramic element that is designed for low-frequency operation. A 50/200 kHz transducer is a common option, where the 50 kHz frequency provides a wider cone for finding structure and the 200 kHz frequency gives a tighter, more detailed view. However, a CHIRP transducer with a frequency range like 42–65 kHz is better suited for extreme depths. Many modern units include a “high CHIRP” setting for shallower water and a “low CHIRP” setting for deep drops. Look for a transducer that supports both, giving you flexibility across different fishing scenarios.
Screen Size and Sunlight Visibility
Hawaii has intense sun, and glare on a screen can make a fish finder unusable. A screen that looks fine indoors often becomes a mirror in direct tropical sunlight. Look for a display with high resolution and good brightness, typically measured in nits. Units with at least 800 nits of brightness perform reasonably well in direct sun. Larger screens, 7 inches or more, make it easier to see detailed bottom contours and fish arches. But, if you are kayak fishing, a large screen can take up too much space and drain your battery quickly.
For kayaks, a 5-inch screen is often the sweet spot—small enough to mount without getting in the way but large enough to read at a glance. For center consoles and larger boats, a 9-inch or even 12-inch screen is easier to see from a standing position. Think about where you will be sitting or standing when you use the unit. You need to be able to read the display without moving your head too far from where you are steering.
Down Imaging and Side Imaging: Do You Need Them?
Down imaging provides a photographic-like view of the bottom beneath your boat. It uses higher frequencies to create a detailed structure picture. For Hawaiian bottom fishing, this is useful when you need to identify rocky ledges and pinnacles that hold fish. Side imaging, on the other hand, scans 200 feet or more to the left and right of your boat. This is helpful when trolling for pelagic species or trying to find a wide area of structure without driving directly over it.
Do you need both? Not necessarily. If you primarily bottom fish, down imaging is more valuable than side imaging because it gives you a clear view of the exact spots where fish are likely to be holding. Side imaging becomes useful when you are prospecting new areas or trolling, as it quickly covers much more water. If you are fishing on a budget, prioritize down imaging. If you have the funds and the boat space, side imaging adds a lot of versatility. That said, you don’t need to feel that you are missing out on essential functionality if you skip the options.
How GPS and Chartplotting Change the Game
Fishing the same spot repeatedly without marking it is a common mistake. In Hawaii, the best fishing locations are specific ledges, submerged rocks, and holes that are not visible from the surface. Finding them once is luck; finding them again requires GPS waypoints. A fish finder with built-in GPS and chartplotting allows you to mark these spots precisely. On your next trip, you can navigate directly to the waypoint without drifting around.
Many units also come with preloaded coastal maps that show depth contours. These are useful for understanding bottom structure before you drop a line. In Hawaii, some areas have detailed charts, but coverage is not always complete. When you find a new productive spot, you can save it as a waypoint and add your own notes. Over time, you build a personal map of fishing spots that no one else has. This is one of the biggest advantages of spending a little extra for a unit with good GPS capabilities. It transforms your fish finder from a simple sonar screen into a navigation tool that saves time and fuel.
Matching the Fish Finder to Your Boat Type
Your choice of fish finder should also depend on the type of vessel you are using. A compact kayak has different power and space constraints than a 24-foot sport fisher.
Fish Finders for Kayaks
Kayak fishing in Hawaii is popular and effective. However, kayaks have limited space and battery capacity. Look for a compact unit with a screen between 4 and 7 inches. These smaller units often consume less power, which is important if you are running off a small sealed lead-acid or lithium battery. The transducer mount matters too. You need a mounting solution that fits your kayak’s hull, like a through-hull or a transducer arm that extends into the water. Many kayak anglers prefer units with wireless networking so they can view the screen on a phone or tablet mounted in a dry bag, keeping the main unit protected from spray.
Fish Finders for Power Boats
On a power boat, you have more room and a more robust electrical system. You can afford a larger screen, a higher power output, and a more powerful transducer. A 9-inch or larger display is comfortable to view from several feet away. Through-hull transducers are more practical on a boat because they sit flush with the hull and do not create drag or risk damage from debris. You can also run higher power outputs without worrying about battery drain since a boat’s starter battery or house battery typically handles it easily. For boats, prioritize power and screen size over portability.
Common Mistakes Anglers Make When Buying a Fish Finder
Avoiding common pitfalls can save you time, money, and frustration. One frequent mistake is buying a fish finder without considering the transducer installation. A transducer that is not installed properly will not read correctly and can even cause inaccurate depth readings at high speeds. Another mistake is ignoring the update capabilities of the unit. Like smartphones, fish finders receive software updates that improve performance and add features. Choose a unit from a manufacturer known for providing regular firmware updates.
Many anglers also purchase a unit without checking the power requirements against their boat setup. If you run a kayak, an older 12-volt battery may not hold enough charge for a large, power-hungry screen on a long day. On a boat, make sure the fish finder is connected to a circuit breaker rather than just the accessory plug, which can overload if the unit draws too much current. And without question, don’t just pick the least expensive model—while a budget unit might work on a freshwater pond, it will likely disappoint in deep Hawaiian waters.
Frequently Asked Questions
What depth do I need my fish finder to reach in Hawaii?
Most Hawaiian bottom fishing takes place between 200 and 600 feet. A unit that can clearly read bottom at 500–700 feet is ideal for achieving a clear read most of the year. Look for a unit with at least 500 watts RMS output to ensure clean readings at those depths.
Is CHIRP necessary for fishing in Hawaii?
Yes, CHIRP is highly recommended. It provides better target separation than traditional 2D sonar, allowing you to distinguish between fish, bait, and bottom structure. This is especially useful when fishing around steep rock ledges where fish hold close to the bottom.
What is the best screen size for a fish finder in Hawaii?
For kayak anglers, a 5-inch screen is practical and easy to mount. For boat anglers, 9 inches or larger is easier to read from a distance and provides a better view of detailed bottom contours. Your choice should consider your boat size and personal eyesight.
Can I use a fresh water fish finder in the ocean?
You can, but the unit and transducer must be saltwater-rated to withstand corrosion and moisture. Many freshwater-only units have exposed connections that will fail quickly in a saltwater environment. Always choose a unit that is explicitly designed for saltwater use.
Do I really need GPS on my fish finder?
Having GPS greatly enhances your ability to return to productive fishing spots. In Hawaii, where fishing often depends on knowing specific ledges or rocks, GPS is extremely useful. Even a basic GPS with waypoint marking can transform your fishing productivity, and is worth the investment over a sonar-only model.
Conclusion
Finding the right fish finder for Hawaiian waters comes down to understanding the conditions you will face and matching the technology to your fishing style. Prioritize power for deep water, choose a CHIRP-capable transducer for clear readings around structure, and select a screen size that fits your vessel. Add GPS capability to mark your own spots, and you will spend more time fishing and less time searching. Avoid the temptation to buy a cheap all-in-one unit that promises much but delivers little in deep ocean conditions. Take your time, consider your budget, and pick a unit that will serve you for years to come.